Growing Things: Container gardening lets carrots grow in small spaces

The CHRONICAL HERALD – https://www.thechronicleherald.ca/lifestyles/homes/growing-things-container-gardening-lets-carrots-grow-in-small-spaces-451564/
Gerald Filipski is the author of Just Ask Jerry.
I was talking to a friend and his wife the other day who recently had downsized and moved into a townhouse with a very small yard.
They were lamenting the fact that they did not have a vegetable garden any more, and the thing they missed the most were their carrots, because they enjoyed the sweetness of homegrown carrots over store-bought. I told them that they could grow their own carrots in containers easily, and the more we talked the more excited they got at the possibility of growing their own veggies again.
On my way home I thought that there must be others in the same position and thought this would make a good column. I know we talked about this five or so years ago but the timing seemed right to revisit the topic.
This downsizing is a trend I am seeing more and more as our population ages and people are downsizing. The good news on the gardening scene is that container vegetable gardening is not only possible but highly successful. Plant breeders continue to develop dwarf vegetable varieties for containers, and more and more gardeners are experimenting with growing all types of vegetables in all types of containers.
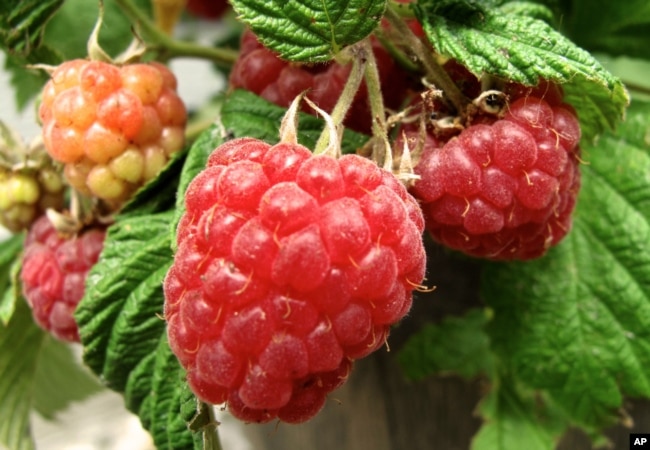
Growing root crops such as carrots in containers is an ideal situation because the containers can ensure a deep root run. This is opposed to the heavy clay soils that many Edmonton gardens have that can inhibit good root crop growth. Now, having said that, the container needed to grow root crops would need to be deeper to accommodate the long roots but carrots, beets, parsnips, swedes and turnips are all possible.
I would recommend a container that is at least 18-24 inches deep with a couple of drainage holes. This depth allows them plenty of room for growth, and you will likely be harvesting them earlier anyway since you will want to enjoy the young, sweet carrots. You can plant successive crops in different containers every few weeks in the spring. Remember that good drainage is essential, as carrots do not like sitting in wet soil.
Carrots prefer a looser and lighter soil. A good quality potting mix is a good bet and I would add compost to the mix at a ratio of two parts potting mix to one part compost. Do not use bagged topsoil or soil from a garden, as it has a tendency to compact and the carrots will struggle to grow through it.
I have always found that when planting carrot seeds, the seeds themselves can be hard to see, especially when they are sitting on the soil. This can make it very easy to overseed a container. The telltale sign, of course, is after they begin to sprout and you can easily see the overcrowded seedlings. If you try to thin out the seedlings by pulling them out it is very easy to damage the ones that you are intending to leave growing.
A good tip I learned many years ago is to cut out the overcrowded ones with a sharp pair of scissors rather than trying to pull them out. The root left behind will die and feed the soil and remaining seedlings. Just take your time when trimming out the unwanted seedlings.
Thin the seedlings to between one and four inches apart and remember that they do prefer the cooler days of spring. In the hot summer months you should offer your carrots some shade. Keep the container well watered. Carrots like to have a moist (but not wet) soil. Fertilize your carrots with a fertilizer lower in nitrogen such as 5-10-5.
Depending on the variety of carrots they will mature in 60-75 days. However, you can harvest them earlier for a sweeter and more tender carrot. I have grown potatoes, cucumbers, tomatoes, zucchini, kale, lettuce, spinach, and many other veggies successfully in containers.
(Continued)
Indoor gardening: 21 easy-to-care-for plants

HOME AND GARDEN May 04, 2020By
- Mary Welch, For the AJC
Stuck inside? Design your own plant-filled sanctuary.
It’s fair to say hundreds of wannabe gardeners are flocking to hardware stores, nurseries and do-it-yourself warehouses to purchase flowers, shrubs and vegetables. Some will, in fact, discover a green thumb and subsequently be overwhelmed with squash and tomatoes, while others will curse the elements for their lack of success, blaming the weather, interfering animals or not enough space.
But there is a solution — indoor gardening. There are a variety of options to start your own greenhouse that will not only enhance your home decor but help purify your air.
“The key to an indoor garden is getting plants that are super easy and don’t require much care,” says Terry Furuta, owner of Terry Furuta Floral Designs in Buckhead. “There are some plants that can be tricky, like ferns. Some believe that orchids are difficult, but I love orchids, and if they’re in the right location, it’s easy.”

Lady slipper, an easy-care plant that Terry Furuta of Terry Furuta Floral Designs in Buckhead recommends. (Hyosub Shin / Hyosub.Shin@ajc.com)Photo: For the AJC
To have success with your indoor greenhouse, the first step is to determine the amount of light and select plants that thrive in that environment, says Michael Chapman, a horticulturist with Pike Nurseries.
Be mindful of where the windows are, what direction they face and how far from the window the plant will be placed. Holley Beagle, nursery manager at Grant Park’s Garden*Hood, says a good way to figure out the light situation is to set up a blank piece of paper in the spot where you are planning to place the plant and hold your hand about a foot off of the paper during the brightest part of the day. If there is a clear shadow, that indicates a bright light; a fuzzy shadow means medium light; and no shadow equals no light. Rotate the plant every couple of weeks so it grows evenly rather than toward the light.
The thicker and greener the leaves, the less light they require, says Evelyn Willis, a designer with Willis Flowers in College Park. She’s a fan of the snake plant (also known as the mother-in-law’s tongue), which can be neglected for weeks, can survive in low levels of light and has few insect problems.

Succulents at Pike Nurseries’ Lindbergh location on Thursday, April 30, 2020. (Hyosub Shin / Hyosub.Shin@ajc.com)Photo: For the AJC
The next step is important because it is the major reason why plants die — overwatering. Plant soil should be checked weekly; put your hand slightly on the top of the soil, if it’s moist, don’t water. However, if it’s dry, give it a good soak, and leave it alone. It’s preferable to fully saturate the soil and allow it to dry out in between waterings.
“There are telltale signs you’ve watered too much,” Chapman says. “If the leaves are starting to wilt, cut back.” There are moisture meters that indicate the soil’s moisture level, and he advises only using self-watering plant orbs for vacations, not everyday use.
Another consideration is the container. Not only must it have good drainage (or rocks at the bottom), but it must be appropriate for the plant. “How much space do you have to utilize?” asks Beagle. “The plant will grow into the container. Don’t start with a large pot. Don’t go more than twice the size of the pot that it’s currently is in. A frequent mistake is that people put a smaller plant into a large container, and they run the risk of overwatering.”
Chapman recommends not repotting the plant until at least six months to eliminate stress. He agrees that upping the container size should be gradual. “If you go from a six-inch pot to a 12-inch, you will not be successful. It needs to get acclimated to the situation and humidity before transplanting.”
Regardless if the plants are needy or easy, all need fertilizing and may have an insect issue. Insects, partially little white bugs that look like cotton on the back of the plants, can be easily eliminated with organic sprays, neem oil or insecticidal soap.
As for fertilizing, Beagle recommends monthly feedings while Chapman prefers only a couple times a year, especially in the spring.
Another way to have an indoor greenhouse is one of Furuta’s specialty: a terrarium. He even gives classes on building a terrarium. “Terrariums require no maintenance, and they’re perfect for people who have other homes or travel a lot. You can leave them for months at a time, and they’ll take care of themselves. And, they’re fun to watch. They have their own ecosystems, and it rains inside because of the condensation.”

Cloche Terrarium designed by Terry Furuta, owner and florist, at Terry Furuta Floral Designs in Buckhead on Saturday, May 2, 2020. (Hyosub Shin / Hyosub.Shin@ajc.com)Photo: For the AJC
So, which plants are the easiest, and which are for the more experienced gardener? There seems to be a split on orchids. Futura says they’re easy, while Willis and Monica Losick, a floral designer with the Flower Cottage on Main in East Point, consider them temperamental. “You either have luck with them or you don’t,” says Losick simply.
Not all people are fans of ferns, either, although they do tend to thrive in the bathroom. If you stress out a ficus tree, it will quickly drop its leaves. Losick says that succulents don’t require much water and flourish in small, compact indoor gardens. “They’re a little minimalistic and easy.”
All said that indoor plants are easy as long as you look for signs of overwatering or improper sunlight. “You’ll build a relationship over time with your plants,” says Chapman. “And, then all you have to do is look at it, and you’ll know what it needs.”
(Continued)
An almost-instant vegetable garden for novice growers
Each box arrives full of vegetable plants and seeds packed into the soil so that new plants sprout after the first round goes out of season.

By Grace Griffin Globe Correspondent,Updated May 4, 2020
You don’t need any gardening experience to grow some organic vegetables from home this spring. Boston Victory Gardens has made the enterprise as foolproof as possible with its launch of at-home container gardens.
Founded by landscape designers Ellen Abdow, owner of Perennial Gardens LLC, and Jenn Nawada, owner of Nawada Landscape Design Inc. and lead landscaper on PBS’s “This Old House,” Boston Victory Gardens delivers pre-planted, portable vegetable gardens to Greater Boston customers’ doors.
Abdow and Nawada teamed up to create a new business when sheltering-at-home customers showed interest in growing their own produce. They love gardens, but they don’t have any experience gardening, Abdow said of her clients. “And one thing that we know is being with plants and growing really does help you feel good,” she added.
Each box arrives full of vegetable plants and seeds packed into the soil so that new plants sprout after the first round goes out of season. The company offers a range of themed boxes from Taco Tuesday, containing hot peppers, tomatoes, and other ingredients you’d find in a taco, to Mixologist, comprising herbs handy for cocktails, and the Green Monstah, devoted to classic salad vegetables.
Starting at $225, the boxes aren’t cheap, but they’re designed to be easy to cultivate. Nawada, an expert in soil and plant science, explains that each is filled with engineered soil and is horticulturally failure resistant, meaning even the most inexperienced gardeners can collect the fruits of their labor.

The 3-by-1-foot large boxes come with some plants ready to be harvested and are made to last through multiple growing seasons. Smaller sizes are also available. As long as gardeners water and trim the sprouts, some vegetables like carrots and herbs can last until the winter frost. The company provides plant care instructions and recipes with each order.
“I think this is a great testing zone to start small and then maybe expand next year into another garden,” Nawada said.
For more information and to see the delivery area map, visit bostonsvictorygardens.com.
Short On Outdoor Space? Try A Container Garden

MARKUS SPISKE / UNSPLASH
By KATELYN HARROP & CHARITY NEBBE • MAY 4, 2020
https://www.iowapublicradio.org/post/short-outdoor-space-try-container-garden#stream/0
Gardening isn’t limited to sprawling backyards and hand-built raised beds. With just a few buckets, pails or pots you can transform even the smallest balcony or patio into a healthy and diverse container garden bursting with spring flavor.
On this episode of Talk of Iowa, host Charity Nebbe is joined by Richard Jauron, Iowa State University Extension horticulture specialist and Cindy Haynes, associate professor of horticulture at Iowa State University for a look at what it takes to create a thriving garden one container at a time.
Guests:
- Richard Jauron — Horticulture specialist, Iowa State University Extension
- Cindy Haynes — associate professor of horticulture, Iowa State University
Fight Tension, Boredom with a Container Garden

https://learningenglish.voanews.com/a/fight-tension-boredom-with-a-container-garden/5401518.html
From VOA Learning English, this is the Health & Lifestyle Report.
Research shows that growing fruits, vegetables and other plants can make us happier and relieve tension. Working with dirt and plants can be fun. Also, when we garden, we are outside, getting sunshine, fresh air and exercise.
Best of all – a garden gives us healthy fruits and vegetables to feed our families. This can increase our sense of independence. Every time we bite into a sweet tomato or a fresh green bean, we can say happily, “I grew this!”
That’s right. But not all of us have space, time or money for a large garden.
Well, you can garden in small spaces with containers. Container gardening is an easy way to grow vegetables when you lack the space. Even on a balcony or rooftop, you can still garden in containers.
If you do not have money to buy containers, look around your home or neighborhood. You can start your garden in just about anything. Do you have buckets, baskets, cloth bags or boxes? You can use all of them!
Research your location.
Before starting, decide on a place. How much sunlight will it get? Do you have safe access to a rooftop? Is it protected from the wind? Are you able to easily water the plants? All these things are important.
Pick the right plants.
In your containers, you can control the soil and the amount of water, but not the sunlight. So, find out which plants can grow in the light conditions you have.
The website Gardeners.com says that most vegetables need at least six hours of sunlight every day or full sun. However, some plants can grow in partial shade. This means direct sunlight for about three to six hours.
Here is a rule of thumb: If you eat the fruit or root of the plant, it needs full sun. This includes tomatoes, eggplant, peppers, squash, potatoes or carrots.
If you eat the leaves, it can grow in partial sun. This includes broccoli, cauliflower, beans, beets, kale and salad greens. Some herbs, such as mint, cilantro and thyme, grow well in partial sun.
Pay attention to the container depth
When growing in containers, the soil depth is important. For example, potatoes and carrots need a deeper container than other vegetables. Plants that do well in containers do not have very deep roots. However, you will have to research which plants grow well in your area of the world.
| Dirt Depth | Plant |
| 10-12 cm (4-5 in) | chives, radishes, lettuce and other salad greens, basil, coriander |
| 15-18 cm (6-7 in) | bush beans, garlic, onions, Asian greens, peas, mint, thyme |
| 20.5-23 cm (8-9 in) | pole beans, carrots, chard, cucumber, eggplant, fennel, leeks, peppers, spinach, parsley, rosemary |
| 25.5-39.5 cm (10-12 in) | beets, broccoli, okra, potatoes, sweet corn, summer squash, dill, lemongrass |
Grow up!
In small spaces, do not forget about growing upward. You can buy or build a lightweight, ladder-like structure for your plants to grow up. Plants that grow up nicely are peas, beans, cucumbers and tomatoes.
Another way to use a small space is to grow down in hanging baskets. If your baskets are not very deep, pick plants with shallow root systems. Strawberries and many kinds of herbs can grow very nicely in a small hanging container.
Just remember: With smaller containers or hanging baskets, you will need to water them more.
Grouping
With container gardening, you can grow different plants in the same pot. This saves room. And some plants may grow better when paired with another plant.
However, not all plants grow well together. Some compete for the same nutrients. Also, do not grow plants in the same pot if they have very different water and soil needs.
These plants grow well together:
- Beans, carrots and squash
- Eggplant and beans
- Tomatoes, basil and onions
- Lettuce and herbs or
- Spinach, chard and onions
These groupings may not work so well:
- Carrots with dill or fennel
- Tomatoes or squash with potatoes
- Onions or garlic with beans and peas
Wind
If wind is a problem where you live, remember to protect the plants. Wind can damage parts of the plants. It can also dry them out. Choose a location for your garden that has shelter from a building or make your own wind protection. Grouping plants together can help, too.

Water
Your garden will need a regular supply of water. So, try to water your plants at the same time each day unless there is rain. It is best to water early in the morning. Watering at night can cause problems.
However, if you can’t water in the morning, water in the late afternoon or early evening. And put the water directly on the dirt.
Also, try not to water during the hottest part of the day. The water may evaporate too fast. Also, water droplets on leaves can burn them.
Dirt and Fertilizer
Regular garden dirt will not work as well for container gardens. The perfect mix is made up of peat moss, vermiculite or perlite and compost. Styrofoam, rice hulls or sand can be used instead of vermiculite or perlite.
This soil-free mix delivers water, fertilizer and air to plant roots more quickly. It also drains well. If water sits on the roots, you may get root rot.
Also, when growing in containers, plant food, such as compost, is especially important. Some plants just won’t grow without it.
Okay, so you have chosen your location and your plants. Now, you are now ready to start growing!
Here’s how to start your garden.
(Continued)
How to grow a vegetable garden in times of food uncertainty

In today’s “Growing Together” column, Don Kinzler shares tips to start growing some of our own food during the coronavirus pandemic.Written By: Don Kinzler | Mar 28th 2020

Toilet paper wasn’t the only thing in short supply in recent weeks. Potatoes were hard to come by in the grocery store, and canned and frozen vegetables were sparse, not to mention the bare bread aisle.
The pandemic proves scarcities are possible for nearly everyone, and it’s no surprise home vegetable gardening is suddenly viewed with great interest.
Back on Feb. 1, our garden column titled “Victory gardens are back! Here’s why,” explained about growing your own food, which offers increased food security, plus other benefits. Considering the pandemic, now might be the time to kick Victory Gardens into high gear.

Vegetables like potatoes, squash, carrots and onions store well for use in winter months. Forum file photo
What if you don’t know how to plant a garden? Beginning this week, we’ll do a three-week series on vegetable gardening basics. This week we’ll discuss traditional garden practices. Next week we’ll focus on raised beds, container gardens and growing vegetables without a traditional plot of ground. The third week will discuss community gardens and how we can participate in group gardening.
Following is a guideline for growing a vegetable garden the traditional way, with a plot of ground. Many of these tips also apply to the raised gardens we’ll discuss next week.
Garden location: Full, all-day sun is required for most vegetables. Leafy vegetables such as lettuce, spinach, kale and herbs will tolerate some partial shade, but vegetables that produce fruits or underground structures require eight hours of direct sunshine, including tomatoes, potatoes, squash, cucumbers, beans and others.
Decide what to plant: Focus on vegetables you or your family like. For winter storage, plant potatoes, squash, onions and carrots. For canning, freezing and pickling, plant tomatoes, corn, beets, peas, beans, cucumbers, broccoli and cauliflower.
When to start: Don’t start too early, as frost still occurs most years during the first half of May. The 10-day window that is most successful for widespread garden planting is May 15–25.
Cool crops and warm crops: If you’d like to split your gardening task and plant some vegetables early, “cool season” crops can tolerate frosts between 28 and 32 degrees. Broccoli, cabbage, carrots, lettuce, onions, peas, radishes and potatoes can be planted in late April through early May. “Warm season” vegetables easily damaged by frost include tomato, pepper, eggplant, beans, corn, cucumber, melons, pumpkin and squash. Wait to plant until May 20 or 25, as they also require warm soil for growth.
Tools you’ll need: If you don’t own a rototiller, you can rent one. Small gardens can be worked with a spading fork. A heavy-duty garden rake to smooth soil before planting. Two wooden stakes with twine to create rows. A yardstick or wooden lath marked at 6-inch intervals to determine spacing between rows. A hoe to dig and cover furrows. Stakes to mark where rows are seeded. (Plastic milk jugs cut into 8-inch strips make weatherproof row markers.)
Seeds versus transplants: Vegetables that are usually seeded directly into garden soil include carrot, beet, bean, pea, lettuce, radish, spinach and sweet corn. Vegetables best planted from pre-started transplants include tomato, pepper, eggplant, cabbage, cauliflower, broccoli and melons. They require a season too long for direct seeding. Squash, pumpkin, and cucumber can be direct seeded, or use started transplants for earlier crops. (If seeded into peat pots in early May, they’ll be ready for garden planting about May 25.)

Everyone can learn to grow vegetables by following basic gardening guidelines. Forum file photo
How to plant: After the garden has been tilled or dug and raked level, mark the first row by stretching twine between stakes from one side of the garden to the other. Using the twine as a guide, pull the hoe along, making a trench in the soil.
Depth depends on seed size. Check the seed packet for recommended planting depth. Plant large seeds like peas and beans about an inch deep and an inch apart. Small seeds like carrot, lettuce, and radish are sprinkled in a shallow trench only ¼-inch deep. Packets usually tell how many feet of row the packet is expected to plant.
Using a hoe or rake, lightly pull soil back into the trench, covering seeds to the proper depth. Then go back over the row, tamping the soil lightly with the flat side of the hoe blade. Mark each row so you know where seedlings are expected to emerge, which helps with weeding since weeds often sprout about the same time as the vegetables.
Next, move stakes and twine to the next row. Most seeded rows are best spaced at least 18 inches apart. Space rows of vegetable transplants like tomatoes and cabbage 24 to 36 inches apart.
Plant Lovers’ Almanac: Here’s how to sow peas in a bucket
Wow, did March come in like a lion, or what?
I am sure that many of you, much like me, were not expecting to be dealing with a viral pandemic as part of our welcome-to-spring garden rituals. However, my message to you this week is to keep calm, keep in touch (at the appropriate social distance, of course), plant peas (pun intended) and garden on!
In the spirit of my message, I wanted to share with you a fun, family, small-space gardening project that aligns perfectly with our Northeast Ohio spring food gardening season.
Cue planting peas in bucket, please.
Yes, your eyes are not playing tricks on you. I am going share a quick “how-to” on planting spring peas in a 3- to 5-gallon bucket.
While peas are not the only crop that you can plant using this method, they are one of the few crops that can be planted in early spring and do well in a container environment.
Here are the materials that you will need to get started:
‒ A 3- or 5-gallon plastic bucket with a handle or other suitable container.
‒ A small- to medium-size bag of container vegetable garden soil mix.
‒ One small roll of landscape fabric.
‒ Trellis or stakes.
‒ Pea seeds.
‒ Power drill with a quarter-inch bit or a hammer and a nail.
Begin by making sure to clean and sanitize the container you will use for your plants. If you are using a recycled container, one that is of food grade is best. The container should be a minimum of 12 inches in diameter and 18 to 24 inches deep.
Next, place your container on a solid surface. Use a power drill or a hammer and a nail to create quarter-inch holes every 3 to 5 inches along the side near the bottom of the bucket/container. DO NOT drill holes in the bottom of the bucket or container for drainage.
Once you have completed placing the holes in your container, turn it right-side up. Cut a piece of landscape fabric to place in the bottom of the container. This will help to keep the soil mix in the container and still allow for drainage.
Fill the bucket to within about 1 inch of the top with a soil mix suitable for growing container vegetables.
Plant pea seeds according to the directions on the seed packet. A general rule of thumb is to plant pea seeds 1 inch deep, spacing them roughly 2 inches apart. Cover the seeds lightly with soil mix and water thoroughly.
Some pea seeds may require you to soak them in water before planting. Follow the instructions provided on your seed packet for the variety you have selected.
Place bamboo poles, stakes or a trellis to provide support for the growing peas into the bucket or container.
Place it in a lightly shaded area until the seeds have germinated. Germination rates vary with different pea varieties; generally, one to two weeks for most peas.
Once the seeds have germinated and seedlings are visible, move the container to an area of full sun.
Monitor your seedlings daily for moisture, sunlight and temperature. Your bucket or container can be placed outdoors in full sun during the daylight of early spring and brought indoors at night until the fear of frost has passed.
Enjoy your harvest and remember to succession plant additional peas in a bucket to ensure a crop all spring long.
OUT IN THE YARD — Consider container gardening for produce

Email the author
Published 12:06 am Thursday, March 19, 2020 – https://www.panews.com/2020/03/19/out-in-the-yard-consider-container-gardening-for-produce/
Do you dream of salad with fresh, homegrown tomatoes?
Do you live in an apartment with a sunny patio that gets 6-8 hours of sun a day? Is it difficult to bend down? Do you want to grow a garden but lack time and energy for a large garden? If yes is your answer, then container gardening is for you!
Choose a new pot or you can reuse an older pot. To reuse an old pot, you should wash out the soil, disinfect the pot and let dry.
Many pot choices are available. Half-whisky barrels, foam ice chests, 5-gallon paint buckets, wheelbarrows, ceramic pots, and a bag of soil cut with openings for plants are some suggestions.
Clay pots are porous and dry out quickly as do small containers. Be creative and look for containers around your home. All pots need a minimum of four holes drilled in the bottom. Useful side holes drilled ¼-½ inch from the bottom for additional drainage can be done. Without drainage, the plant roots will rot.
Always use good quality, new potting mix inside your pots. Diseases and weed seeds hide in the heavy garden soil. Potting mix is lightweight, drains well and has disease- and weed- free properties. When using larger pots, fill the pot where it will grow. It will become heavy when filled with the mix, so rollers used on the bottom of the pot are useful to move it.
Line the bottom of the pot with a coffee filter or used fabric softener sheet to keep the potting mix from washing out. Small rocks covered with landscape cloth can be placed in the larger pot to help with drainage. Slightly moisten potting mix to repot. Add a bottom layer of the mix adjusting to support the plant’s roots. Put the plant in the pot and fill in around the sides packing the soil lightly. Leave a 1-2 inch headspace in the pot for watering.
A 6-10 inch pot is good for growing green onions, parsley and herbs. Smaller pots are appropriate for herbs, lettuce and radishes. Plant dwarf tomatoes and chard in 1-2 gallon pots. Use 5 gallon pots for tomatoes, peppers and eggplant. Cucumbers can be planted in 5 gallon containers but need an additional place to grow as a vine.
Minimize disease by only watering your soil, not the leaves. Pour water in the soil until the water runs out of the drainage hole. Water your pot when the top ½ inch of soil is dry. If you live upstairs, place pots on gravel lined, trays to catch overflow water. Your downstairs neighbors will appreciate you.
Reach Jefferson County Master Gardener,
9 awesome ways for you to grow a garden


| But which one is best for me? The image above: A full tray of Radish microgreens growing on a hemp mat using worm tea as a liquid fertiliser Today I have an interesting article for you that I am sure many will enjoy because it will help you make a better-informed decision on which way you want to grow your fresh food at home. I have actually grown using all the methods mentioned below except one, aquaponics. You will definitely be using one of these growing methods or maybe a few. I will do my best in this short newsletter to help you make your choice. No matter what you choose remember it’s the end results we are after and that’s awesome fresh food on the kitchen table,, yummo! Microgreens – This method of food production starts at the top of the list as it’s awesome for the small space gardener, it’s highly nutritious, tasty and fast to grow. You can grow microgreens in compost, soil, hydroponics or use my prefered method compost and worm tea. Many crops you can harvest in just 7 days with the maximum being 14 days. If you can purchase seed cheaply it can be a very economical way to grow fresh food fast. You may even decide in the future to use seeds from certain plants to grow microgreens as a side crop. Container Gardening – Possibly the top choice for many in this community. Container gardening has a ton of benefits but can come with a couple of drawbacks such as drying out and requiring regular feeding. It’s true you can grow almost any plant in a pot these days and many are now growing large fruit trees in aero pots. The Aero pot self prunes the roots and grows amazing plants. I grow nearly all my herbs in containers and prefer to use the containers that have water well below. This way if I forget to water or go on holidays my plant still get a drink. With this crazy heat and dry weather lately, I have been moving my containers into a morning sun position only. Strawbales – This is a super fun way to grow fresh food at home and so many plants like to grow in this medium. It does take a lot of water to get them started though. However, once they trap the moisture they store it really well. Strawbale gardening is also a wonderful way to start a garden bed above the ground. Why? Because once it’s decomposed you just keep planting in it. All you have to do is keep layering compost on top. I have grown huge crops in bales over the years, everything from Lettuce, herbs, Tomatoes, Zucchinis, Chili’s, Cucumbers and too many more to mention. I did find that Cucumbers went crazy and performed the best out of everything I grew. Raised Beds – The most common way to grow food up high is in a raised bed and this method is a tried a true practice. If you are thinking about growing in raised beds make sure you grow in a quality bed mix that has lots of compost. You will also need to mulch really well and do your best to create a humus layer. I have had lots of success placing underground worm farms in raised beds. By placing an underground worm farm in your raised bed you increase fertilisation, moisture retention and help to build, restore microbe and fungal activity which is the basis to healthy soils. I have a full video tutorial in my worm farming course here on the subject if your interested. Wicking Beds – Wicking beds are a bit tricky to get started and in the very beginning take a while to settle in. Once they are established though and the water is soaking up and the roots have reached down they can be incredible. From my experience, not all plants like to grow in wicking beds. Herbs and leafy greens seem to do the best. As they create a very moist environment they are not always suitable for some plants that don’t like wet feet. If you live in a low humid environment then you may want to try growing Cucumbers, but keep an eye out for fungal issues in humid climates on certain plants. No Dig – The no-dig garden is great for those who have super hard soils, or soils that lack life. They do take a while to get started, but shallow-rooted plants like leafy greens and strawberries can be planted almost straight away. Be aware if you are using a lot of carbon in your bedding that in the beginning stages it will steal away vital nitrogen to help break it down. I recommend in the beginning stages to use lots of compost, worm castings and liquid fertiliser. As mentioned above I like to start mine off as a strawbale garden first. Hydroponics – A choice by many around the globe is hydroponics because it’s clean, relatively easy to use and provides all the nutrients with a plant requires. If you decide to grow in hydroponics you generally need a two-part mix. One part is for the leaf growth and the other for flowering and fruit set. Growing this way can be quite fun but from my experience a little more prone to pests and diseases. If you do take on growing using this method use only a high-end brand that has extra minerals for top results. Coco peat these days seems to be the bedding of choice for growing in hydroponics. Seek out a reputable brand as the cheap Coco peat generally isn’t so good. Aquaponics – I have never grown using aquaponics, but if you like the concept of growing organically in a closed-loop system then it just may be for you. It doesn’t use much water and it’s the fish waste that creates the nutrients. It can be quite expensive to start, but if your handy and like the concept of farming fish too, then you just may be on a winner here. Organic With Worms – My choice is what I believe to be simple, functional, sustainable and extremely healthy for myself and the planet. I grow all my plants in containers, in the ground and in compost this way. The plants in the garden beds are fed by the soil web. Basically, I feed the soil, not the plants and get very good results most of the time. On occasion, I will add some rock minerals, compost and mulch to gardens beds as a top-up. It’s super productive and a cheap way to grow as everything I require is made on site. When plants grow in nutrient-rich organic mediums generally there is fewer issues with pests and diseases as the plants build up their own immune systems to ward off the nasties. I only have a very small space, but able to grow all I require from herbs, leafy greens, fruits and microgreens using compost worms to help me. My container plants all grow in compost and worm castings with an occasional drink of worm tea. The worm tea sometimes comes straight from the worm farm or from a worm cast brew. There will be more coming up about worm tea in future newsletters, as it really is my secret to success! Learn how to make simple liquid fertilisers using worms in my latest course I grow lots of flowering herbs to attract pollinating insects, leave water out for the birds and have a small windbreak for them to hide and feel safe. The satisfaction of knowing I am providing a safe habitat for insects and the local birds is so satisfying. The birds also eat moths and caterpillars which is way cool. At the moment a couple of Magpies and a Willy Wagtail are doing a wonderful job. I hope this article has helped you make a choice and provided some cool tips for you. Maybe you want to try a couple of these methods? If you do I recommend that you don’t take on too many at the start. My advice, become really good at one and once you feel it’s been mastered maybe add another form of gardening to your repertoire. Please just remember to consider the environment and to help others achieve similar results, so we all move towards a fresh food future for all. Happy Gardening Marty Ware ps: Take your seed raising methods to the next level and give them the best possible start they can Course available here now and comes with private coaching |


You must be logged in to post a comment.